Regions of interest (ROIs) and structure sets
A structure/region of interest (ROI) can be represented by either a set of contour points or a binary mask. The ROI class allows an ROI to be loaded from either of these sources and converted from one to the other.
The ROI class
An ROI object, which contains a single ROI, can be created via:
from skrt import ROI
roi = ROI(source)
The source can be from any of the following:
A dicom structure set file containing one or more sets of contours;
A dictionary of contours, where the keys are slice positions in mm and the values are lists of lists of contour points for each contour on that slice;
A nifti file containing a binary mask;
A numpy file containing a binary mask;
A numpy array.
If the input object is a dicom file, the name of the ROI within that file must be given. In addition, if the input source is a dicom file or contour dictionary, in order to convert the contours to a mask, the user must provide either of the following arguments to the ROI creation:
image: Assign anImageobject associated with this ROI. The created mask will have the same dimensions as this image.shape,origin, andvoxel_sizes: This tells the ROI the dimensions of the pixel array to create when making the mask.
Additional useful arguments are:
color: set the colour of this ROI for plotting. If not specified, this will either be read from the dicom file (if given) or the ROI will be assigned a unique colour.name: set the name of this ROI. If the input is a dicom structure set file, this name will be used to select the correct ROI from the file. If not given, the ROI will be given a unique name (“ROI 1” etc)load: ifTrue(default), the input ROI will be converted into a mask/contours automatically upon creation. This can be time consuming if you are creating many ROIs, so setting it toFalsecan save time and allow ROIs to be processed later on-demand.
An Image object associated with this ROI can be set at any time via:
roi.image = image
This image can optionally be plotted in the background when the ROI is plotted.
Plotting an ROI
ROIs can be plotted as contours or a mask or both, and with or without an associated image behind them. The simplest plot command is:
roi.plot()
This will plot a contour in the x-y plane, e.g.:
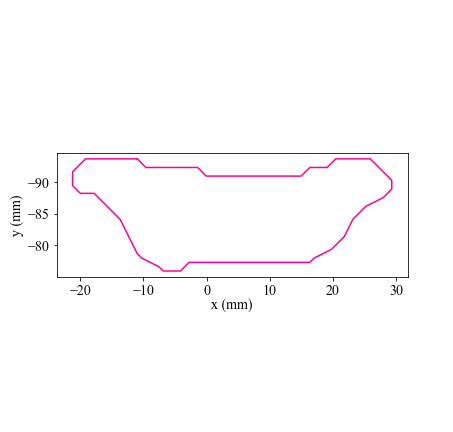
Additional options are:
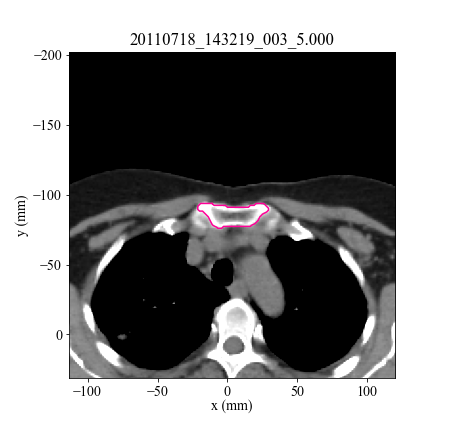
include_image: boolean, set toTrueto plot the associated image (if one is assigned) in the background;view: specify the orientation (x-y,y-z, orx-z);sl,pos, oridx: specify the slice number, slice position in mm, or slice index;zoom: amount by which to zoom in (will automatically zoom in on the centre of the ROI).
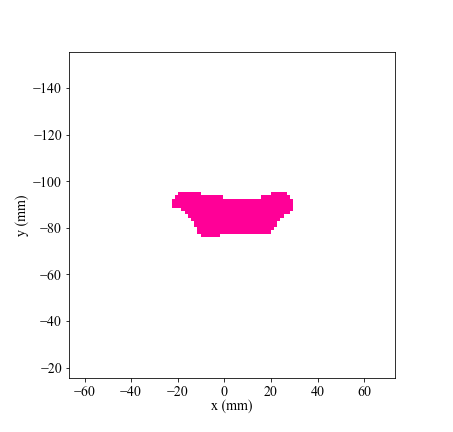
The following plot types are available, set via the plot_type argument:
contour: plot a contourmask: plot a binary maskfilled: plot a contour on top of a semi-transparent maskcentroid: plot a contour with the centroid marked by a crossfilled centroid: plot a contour and centroid on top of a semi-transparent mask
Example contour plot with include_image=True:
Example mask plot:
Writing out an ROI
An ROI can be written to a nifti or numpy file as a binary mask. This can be done either by specifying a filename with an appropriate extension, e.g.
roi.write('my_roi.nii')
would automatically write to a nifti file.
Alternatively, the ROI’s name can be used to create the filename. This is done by just providing an extension, e.g. if an ROI were called “heart”, the following command:
roi.write(ext='.nii')
would produce a file called heart.nii containing the ROI as a binary mask. An output directory can also be optionally provided, e.g.
roi.write(outdir='my_rois', ext='.npy')
would produce a binary numpy file at my_rois/heart.npy.
Getting geometric properties
The ROI class has various methods for obtaining geometric properties of the ROI:
Centroid: get the 3D centroid coordinates (i.e. the centre-of-mass of the ROI) in mm via
roi.get_centroid(), or get the 2D coordinates for a single slice viaroi.get_centroid(view='x-y', sl=10), for example (the slice position in mmposor slice indexidxcan be given instead of slice numbersl)Centre: get the 3D midpoint coordinates (i.e. the mean of the maximum extents in each direction, rather than centre of mass) via
roi.get_centre(). The 2D midpoint of a slice is obtained in a similar way to the centroid, e.g.roi.get_centre(view='x-y', sl=10).Volume:
roi.get_volume(units), whereunitscan either bemmorvoxels(defaultmm).Area: get the area of a given slice of an ROI by running e.g.
roi.get_area(view='x-y', sl=10, units='mm'). To get the area of the central slice, can simply runroi.get_area().Length: get ROI length along a given axis by running
roi.get_length(axis, units)whereaxisisx,y, orzandunitsismmorvoxels.
Structure Sets: the StructureSet class
A structure set is an object that contains multiple ROIs. This is implemented via the StructureSet class.
Loading a structure set
A structure set is created via
from skrt import StructureSet
structure_set = StructureSet(source)
The source can be:
The path to a dicom structure set file containing multiple ROIs;
The path to a directory containing one or more nifti or numpy files, each containing a binary ROI mask;
A list of paths to nifti or numpy ROI mask files.
In addition, more ROIs can be added later via:
structure_set.add_rois(source)
where source is any of the above source types.
Alternatively, single ROIs can be added at a time via any of the valid ROI sources (see above), and with any of the ROI initialisation arguments. An empty StructureSet can be created and then populated, e.g.
structure_set = StructureSet()
structure_set.add_roi('heart.nii', color='red')
structure_set.add_roi('some_structs.dcm', name='lung')
The StructureSet can also be associated with an Image object by specifying the image argument upon creation, or running structure_set.set_image(image). This image will be assigned to all ROIs in the structure set.
Creating a filtered copy of a structure set
Sometimes you may wish to load many ROIs (e.g. from a dicom structure set file) and then filter them by name. This is done via:
structure_set.filter_rois(to_keep, to_remove)
where to_keep and to_remove are optional lists containing ROI names, or wildcards with the * character. First, all of the ROIs belonging to structure_set are checked and only kept if they match the names or wildcards in to_keep. The remaining ROIs are then removed if their names match the names or wildcards in to_remove.
To restore a structure set to its original state (i.e. reload it from its source), run structure_set.reset().
Renaming ROIs
ROIs can be renamed by mapping from one or more possible original names to a single final name. In this way, multiple structure sets where the same ROI might have different names can be standardised to have the same ROI names.
For example, let’s say you wish to rename the right parotid gland to right_parotid, but you know that it has a variety of names across different structure sets. You could do this with the following (assuming my_structure_sets is a list of StructureSet objects:
names_map = {
    'right_parotid': ['right*parotid', 'parotid*right', 'R parotid', 'parotid_R']
}
for structure_set in my_structure_sets:
    structure_set.rename_rois(names_map)
By default, only one ROI per structure set will be renamed; for example, if a structure set for some reason contained both right parotid and R parotid, only the first in the list (right parotid) would be renamed. This behaviour can be turned off by setting first_match_only=False; beware this could lead to duplicate ROI names.
You can also choose to discard any ROIs that aren’t in your renaming map by setting keep_renamed_only=True.
Getting ROIs
Get a list of the ROI objects belonging to the structure set:
structure_set.get_rois()
Get a list of names of the ROI objects:
structure_set.get_roi_names()
Get a dictionary of ROI objects with their names as keys:
structure_set.get_roi_dict()
Get an ROI object with a specific name:
structure_set.get_roi(name)
Print the ROI names:
structure_set.print_rois()
Filtering a structure set
A StructureSet object can be copied to a new StructureSet, optionally with some ROIs filtered/renamed (you might want to do this if you want to preserve the original structure set, while making a filtered version too), via:
filtered = structure_set.filter(names, to_keep, to_remove, keep_renamed_only)
Writing a structure set
The ROIs in a structure set can be written to a directory of nifti or numpy files, via:
structure_set.write(outdir, ext)
where outdir is the output directory and ext is either .nii, .nii.gz or .npy. Dicom writing will be supported in future.
Assigning StructureSets to an Image
Just as ROIs and structure sets can be associated with an image, the Image object can be associated with one or more StructureSet objects. This is done via:
from skrt import Image, StructureSet

image = Image("some_image.nii")
structure_set = StructureSet("roi_directory")

image.add_structure_set(structure_set)
Now, when the Image is plotted, the ROIs in its structure set(s) can be plotted on top. To plot all structure sets, run:
image.plot(structure_set='all')
Note that this could be slow if there are many structure sets containing many structures.
To plot just one structure set, you can also provide the index of the structure set in the list of structure sets belonging to the image, e.g. to plot the most recently added structure set:
image.plot(structure_set=-1)
To add a legend to the plot, set roi_legend=True.
The image’s structure sets can be cleared at any time via
image.clear_structure_sets()